 a Backend for a Mobile App?" width="1024" height="463" />
a Backend for a Mobile App?" width="1024" height="463" />
In this article, you’ll learn what a backend for a mobile app is and everything you need to know to build your backend.
We’ll look at the differences between a backend and a frontend, different backend types, learn about mobile backend functionalities and costs to develop a backend.
Lastly, we’ll learn how to build a backend for a simple mobile application on Back4app — one of the best MBaaS providers.
The terms frontend and backend refer to the separation of concerns between the presentation layer and the data access layer.
The easiest way to understand their differences is to visualize an iceberg. The frontend is above the water level and is everything that a user can see and interact with. The backend on the other hand is the part of the iceberg that’s underwater. It’s the underlying logic that powers the business.
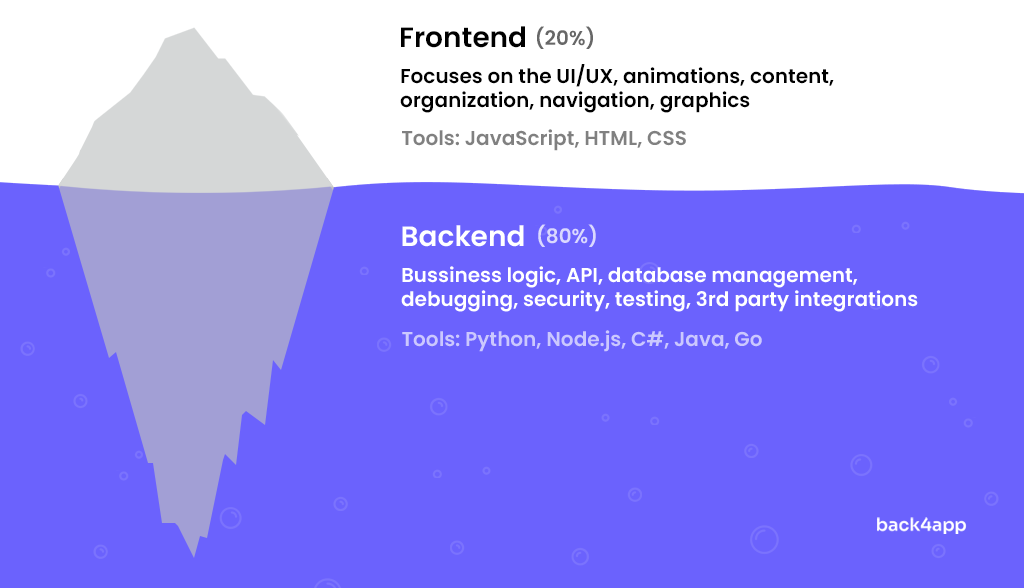
A frontend is a graphical user interface of a website, mobile app, or any other type of client a user can interact with. Frontend includes all the visual aspects of an application including the design, menus, texts, images, videos, and so on. With most projects, it represents about 20% of the total effort and is not repetitive.
Frontend developers need to take care of:
Web frontends are usually implemented with tools like HTML, CSS, JavaScript, and WebAssembly. Native Android apps are written in Java/Kotlin, while native iOS uses Objective-C and Swift.
In recent years a lot of frontend developers adapted tools like React Native, Vue, and Svelte Native to further simplify the development process and make the same codebase work on different platforms.
Frontends can be “deployed” to services like Google Play, App Store, Vercel, Netlify.
Backend or server-side development is the practice of developing the data access layer. The backend is the connection between the database and the frontend. Most backends provide an application layer interface (API), which a frontend can use to fetch and store data.
Data is usually exchanged in JSON or GraphQL format. A backend usually represents around 80% of the work and is repetitive. For example, almost every project requires authentication, authorization, database management et cetera.
Backend developers are responsible for:
Backend developers usually work with programming languages like Python, JavaScript (Node.js), Ruby, C#, Java & Go. At the time of writing the most popular backend architecture is Model-View-Controller (MVC) which has been adopted by a lot of web frameworks like Django and Laravel.
The most important component of a backend is its database. We have different types of databases that we can split into three general categories:
They each have their pros and cons, which should be considered when starting a project.
A backend can be deployed to different platforms based on the level of wanted abstraction. For example, you can use your own server, IaaS (AWS, GCE, Azure), PaaS (Heroku, Digital Ocean App Service), or BaaS (Back4app, Firebase, AWS Amplify).
Keep reading to know more about mobile app backend development.
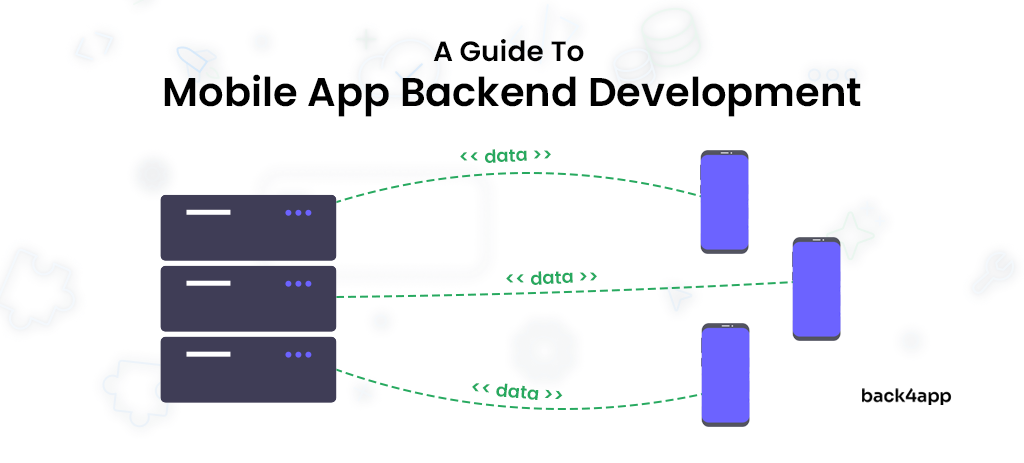
A backend for a mobile application is the part of the app that runs on a server, rather than on the device itself. The backend provides the functionalities that the app needs to store and manage data, authenticate users, process and analyze data, and communicate with other systems or services.
A backend can take many forms, such as a server running on a cloud service, a database, or an API. It provides the necessary infrastructure and tools that the app needs to function properly and enables the app to provide a rich and engaging user experience.
A backend for a mobile app usually provides the following functionalities:
Short answer: If your app functions locally (without an internet connection) then you usually don’t need a backend, but this does not mean your app can’t benefit from a backend.
To better understand this answer, let’s take a look at some of the apps we use in everyday life.
Apps that do not need a backend:
Apps that need a backend:
Now, let’s think of how a backend could improve the apps listed above:
Because of the great benefits backends have to offer almost every mobile application has a backend. If not for storing data, the backend allows mobile applications to collect analytics, send push notifications, monitor apps, collect crash reports, and more. If you want to be successful, you’re most likely going to need a backend.
Depending on the type of your application there are multiple backend types you can choose from. Generally speaking, we can split them into three groups based on their level of abstraction:
Let’s take a look at each one of them.
Software as a service (SaaS) is a software delivery model in which a software application is hosted by a third-party provider and made available to customers over the internet.
SaaS solutions typically require their customers to pay a subscription fee on a monthly or annual basis. This backend type is the easiest to use and allows you to get your backend up and running in a few clicks.
The downside of this backend type is that you’re most likely not going to find a SaaS that ticks all your project’s requirements. To build a real-world backend you’re probably going to have to combine multiple SaaS solutions.
A few examples of SaaS include:
Backend as a Service (BaaS) is a platform that automates the backend side of development and takes care of the cloud infrastructure.
On top of that, it provides features like user management, email notifications, push notifications, cloud code functions, social media integrations, file storage, and payments.
This allows developers to focus on the core business and building the frontend without worrying about the underlying backend and infrastructure. The frontend is usually developed via specialized APIs and SDKs offered by the BaaS vendor. This makes apps less complex and easier to maintain.
The benefits of using a Backend as a Service include a faster development speed, lower engineering costs, and focus on the core business.
A few examples of BaaS include:
Want to learn more about BaaS and MBaas? Take a look at What is BaaS?
A custom backend is the most powerful and flexible option. It offers you total control and allows you to implement features that cannot be implemented with a SaaS or MBaaS solution.
Its biggest drawback is its cost and time to build. By using this approach you’re also going to be fully responsible for your backend’s performance and security.
Building a custom backend usually takes months and requires a skilled backend developer or even a team of backend developers.
Popular frameworks for building custom backends:
For more information about backend frameworks take a look at Top 10 backend frameworks.
There’s no simple formula to calculate the cost of a mobile app backend. The cost varies depending on the complexity of the app, the number of features, its scalability, performance, and so on.
SaaS is typically the cheapest option you can opt for. SaaS products usually follow a straightforward pricing model with monthly or annual subscription fees. Some SaaS providers also offer different pricing tiers depending on the size of your business.
Building a backend with MBaaS is really cheap compared to a custom backend. It allows you to greatly cut the development cost and not have to worry about the infrastructure or hiring a team of specialized backend engineers. This saves you a lot of money!
Most MBaaS providers come with different pricing tiers depending on the size of your app. By using MBaaS you can expect to pay anywhere from $15 to $500 per month.
Custom backend development is the most expensive option. By picking this option you’ll have to assemble a team of skilled developers and take care of your backend’s infrastructure.
The prices for building a custom backend generally move between a few thousand dollars to tens of thousands of dollars depending on the project requirements.
Since implementing a custom backend is a difficult task, companies usually outsource it to companies specialized in software development.
In this section of the tutorial, we’ll look at how to develop a backend for a mobile app using Back4app.
Back4app is one of the best open-source Backend as a Service (BaaS) solutions on the market. It offers an extensive range of features and benefits to its users allowing developers to rapidly build web and mobile applications.
By using Back4app you’ll be able to focus on the core business instead of worrying about the backend or the underlying infrastructure.
The solution comes with a feature-rich and easy-to-use dashboard and a command line interface (CLI). They also provide SDKs for all your favorite tools like Flutter, React Native, Node.js, Angular, Android, iOS & more!
Back4app’s key features include:
For more information on their features check out Back4app Features.
Back4app follows a simple and straightforward price model that can suit an app of any size. They offer a generous free plan (no credit card required) that is great for prototyping and testing out the platform. It includes:
For more information about Back4app pricing take a look at the Pricing page.
We are going to be building a backend for a simple news app. The app is going to allow editors to create, update, and delete articles. To make administration as easy as possible we are going to enable Back4app’s Admin App.
We’ll take care of the backend security and showcase how to use the backend’s REST API. The backend is going to be built with a minimal amount of code.
Prerequisites:
Objectives:
By the end of this tutorial you’ll be able to:
The following steps will require you to have a Back4app account. If you already have it log in otherwise go ahead and sign up for the free account.
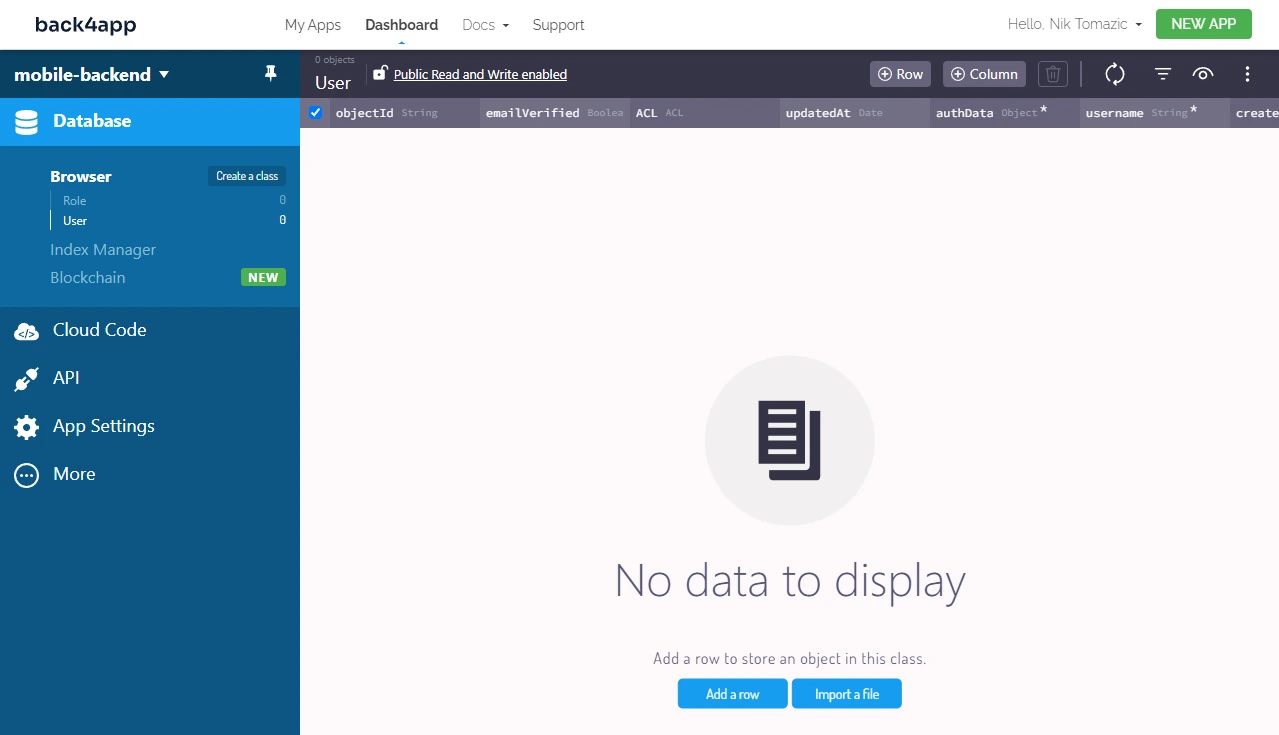
To work with Back4app we first need to create an app. As you log in to your dashboard you’ll see the list of your apps. Click on “Build a new app” to create a new app.

Give it a custom name and then click “Continue”.
Back4app is going to take a few moments to prepare everything required for your app like the database, application layer, scaling, backups & security.
Once your application is ready you will be redirected to your app’s dashboard.
In this section of the tutorial, we’ll create all the required database models.
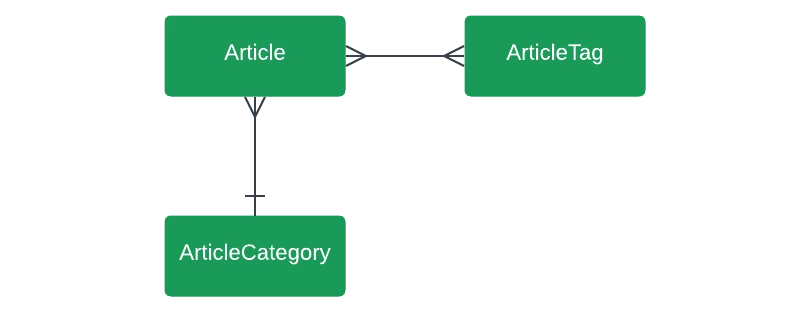
As mentioned in the project introduction we are going to build a simple news app. Our database is going to be composed of the following models:
This database structure will later allow us to filter the articles based on categories or tags. Let’s draw an entity relationship diagram (ERD) to better understand the relationships between the models:
Now, let’s actually create the models.
Start by creating the ArticleCategory model. On the top left of the screen click on “Create a class”, name it ArticleCategory and add the following fields:
+-----------------------------+-------------+---------------+----------+ | Data type | Name | Default value | Required | +-----------------------------+-------------+---------------+----------+ | String | name | | yes | +-----------------------------+-------------+---------------+----------+ | String | description | | no | +-----------------------------+-------------+---------------+----------+ | Pointer -> User | author | | yes | +-----------------------------+-------------+---------------+----------+Next, create another class named ArticleTag with the following details:
+-----------------------------+-------------+---------------+----------+ | Data type | Name | Default value | Required | +-----------------------------+-------------+---------------+----------+ | String | name | | yes | +-----------------------------+-------------+---------------+----------+ | Pointer -> User | author | | yes | +-----------------------------+-------------+---------------+----------+Lastly, create another class named Article with the following fields:
+-----------------------------+-------------+---------------+----------+ | Data type | Name | Default value | Required | +-----------------------------+-------------+---------------+----------+ | String | title | | yes | +-----------------------------+-------------+---------------+----------+ | String | description | | no | +-----------------------------+-------------+---------------+----------+ | String | content | | yes | +-----------------------------+-------------+--------------+-----------+ | Pointer -> ArticleCategory | category | | no | +-----------------------------+-------------+---------------+----------+ | Relation -> ArticleTag | tags | | no | +-----------------------------+-------------+---------------+----------+ | Pointer -> User | author | | yes | +-----------------------------+-------------+---------------+----------+That’s it for the database architecture. Now let’s add some sample data.
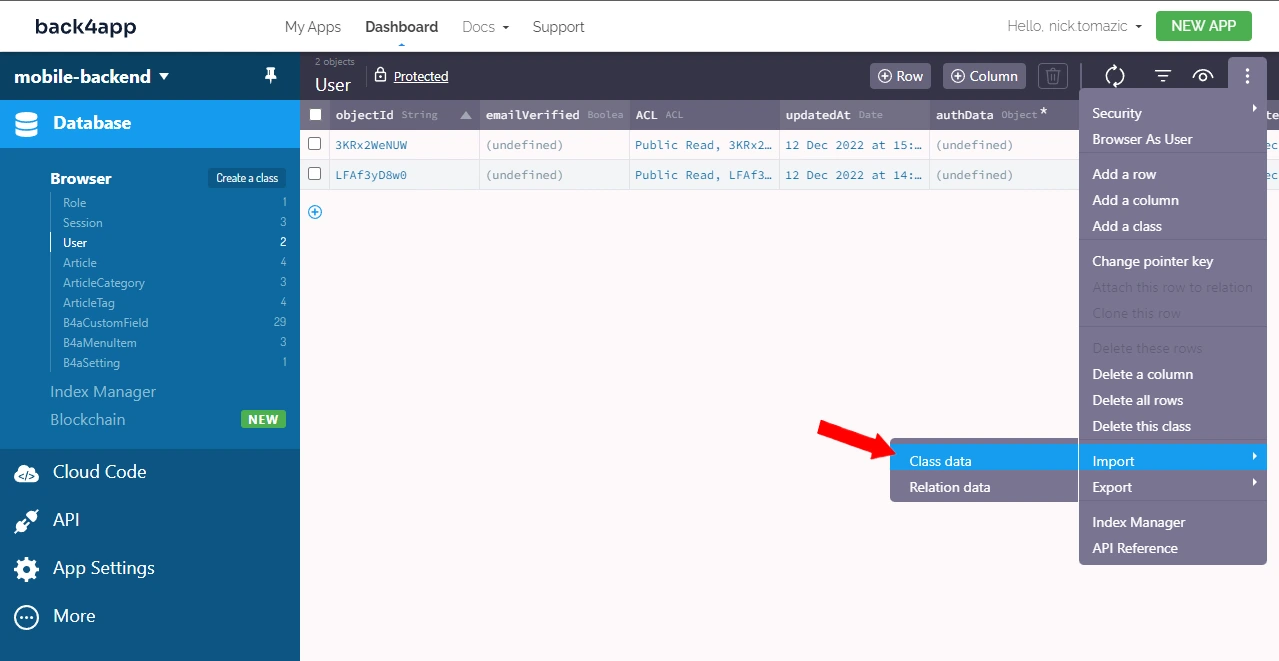
To make things a little bit easier, I’ve generated some data you can import. To import a dataset select the class on the left side of the screen and then click on the three dots on the right side of the screen. Select “Import” > “Class Data” and select the appropriate file.
To download the JSON datasets navigate to the back4app-mobile GitHub repo, click on “Code” and then “Download ZIP”.
Import the JSON files in the following order:
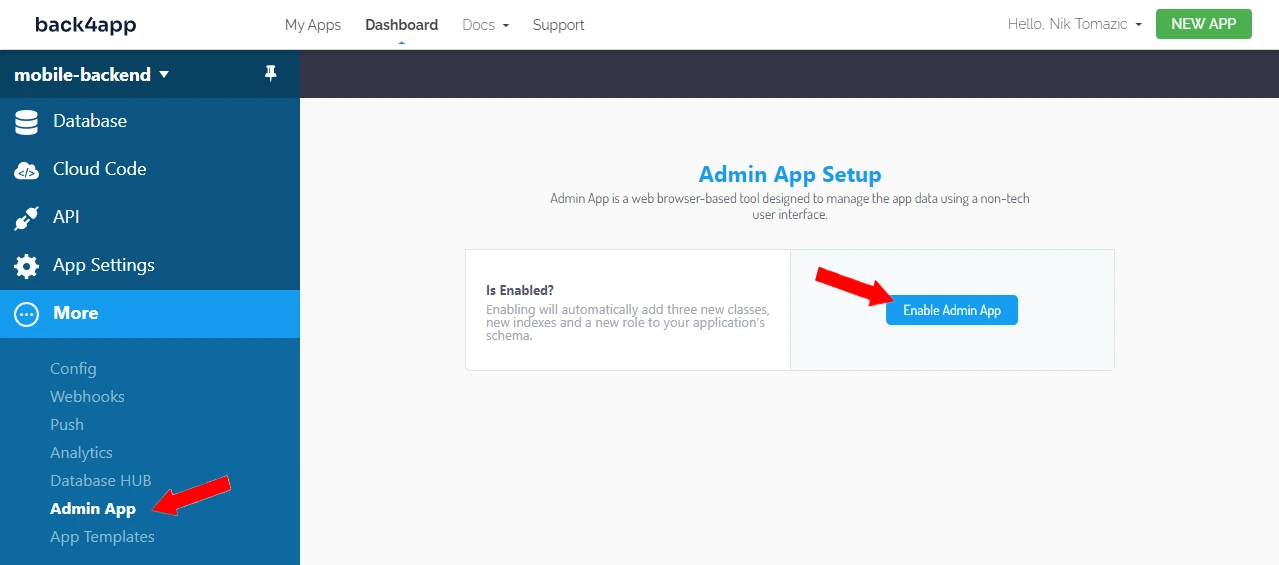
To make administration a little bit easier we’ll enable the Admin App. The Admin App is a web browser-based tool designed to manage the app data using a non-tech user interface.
Navigate to your app dashboard, click on “More” > “Admin App” and then click on the “Enable Admin App” button.
Pick a username and password. I’ll go with:
Username: admin Password: complexpassword123Then pick a domain name you’d like to use to access your admin panel. I’ll go with:
mobile-backend.admin.back4app.comGreat, you can now log in to your admin dashboard at the selected domain.
To learn more about Back4app Admin App take a look at the official docs.
To make our app secure we have to perform the following:
To disallow client class creation navigate to your “App Settings” > “Server Settings” > “Core Settings” > “Edit”, scroll down to the bottom of the page, and untick “Allow Client Class Creation”.
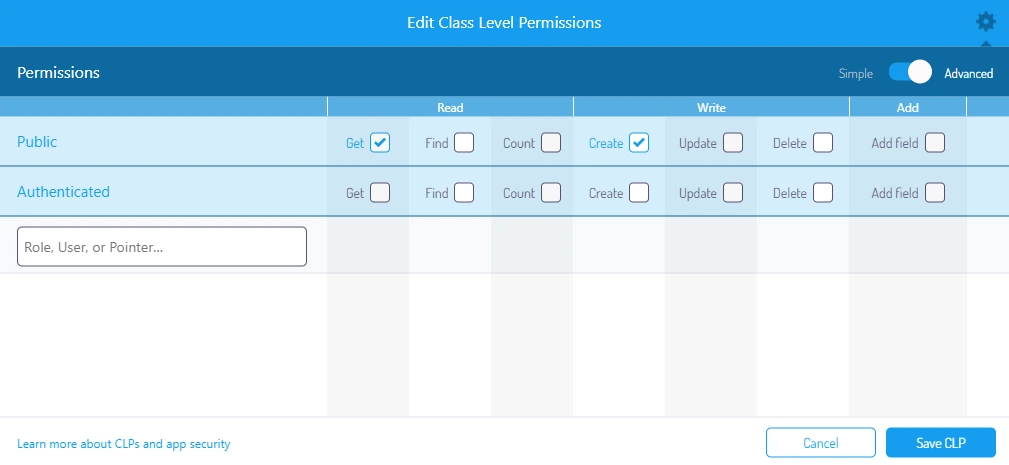
Select your User model within the “Database” tab, and click on the three dots on the right side of the screen > “Security” > “Class Level Permissions”. Then click the cog icon and change it to “Advanced”. Untick everything except Get and Create like so:
Do a similar thing for all your custom models ( Article , ArticleCategory , and ArticleTag ). This time disable everything except Read and Find for the Public group like so:
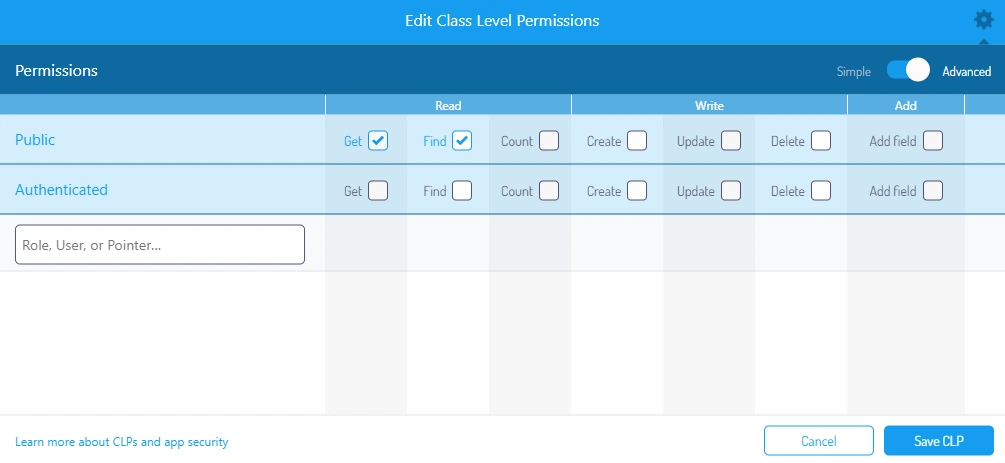
This way unauthenticated users will only be able to find and read the articles.
For more information on security take a look at Parse Security.
In this section of the tutorial, we’ll test our API by using the built-in API Console.
To open the REST API Console, navigate to your app’s dashboard. Select “Console” in the “API” section and then “REST”.
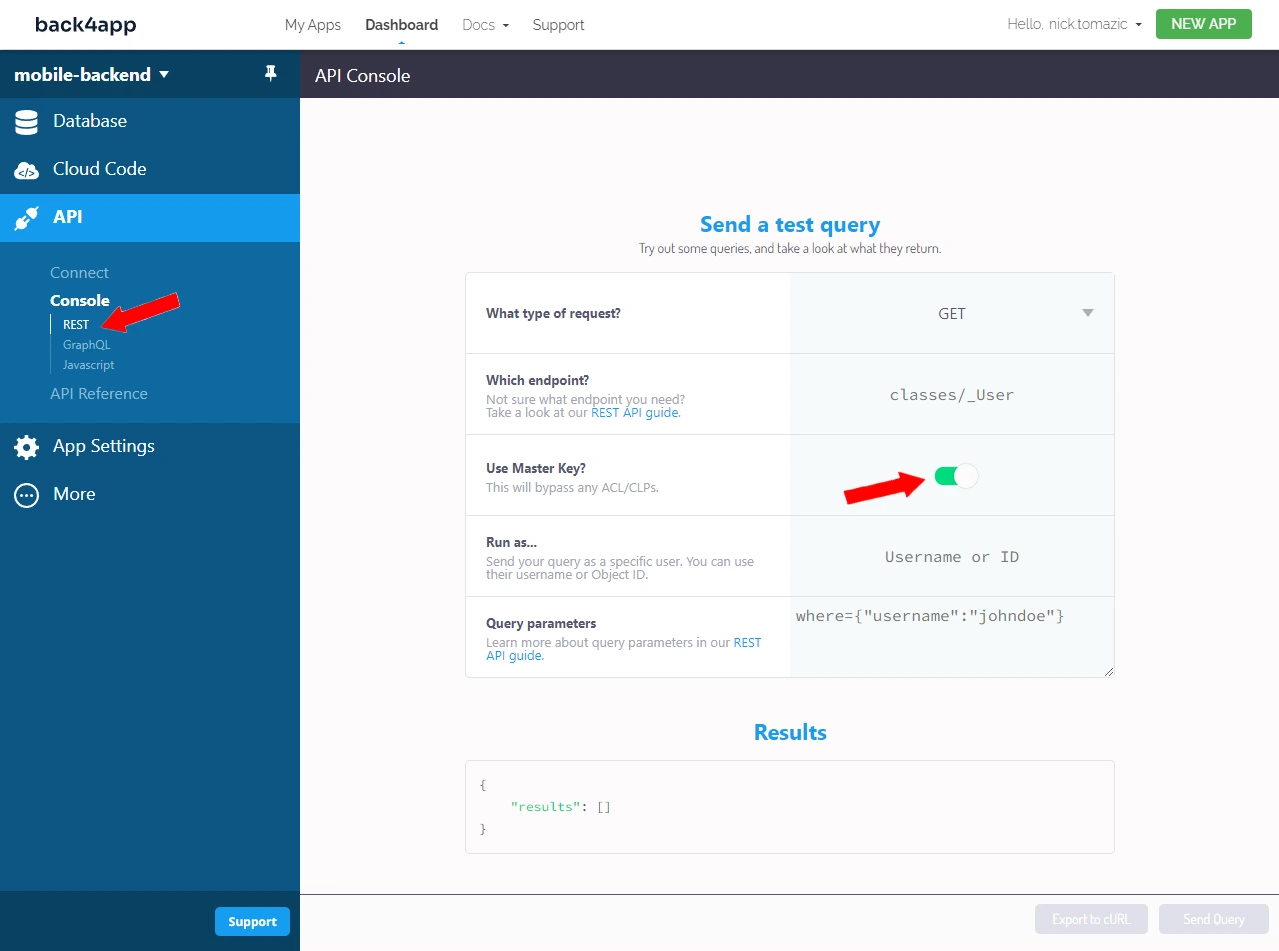
Due to our ACL/CLPs make sure to tick “Use Master Key?” for the requests to be successful.
Objects can be retrieved with the GET request type. For the endpoint use classes/ eg. classes/Article and click on the “Send Query” button at the bottom of the page.
The response will look something like this:
< "results": [ < "objectId": "oRwkdx7KgX", "title": "Voting 2022 has ended!", "description": "The voting for year 2022 has ended, the new major is. ", "content": "Lorem ipsum dolor sit amet. ", "category": < "__type": "Pointer", "className": "ArticleCategory", "objectId": "FYxzrBlCBC" >, "author": < "__type": "Pointer", "className": "_User", "objectId": "UZ76K07znv" >, "createdAt": "2022-12-13T09:09:04.845Z", "updatedAt": "2022-12-13T09:09:13.297Z", "tags": < "__type": "Relation", "className": "ArticleTag" >>, . more results . ] >If you wish to fetch a specific result or filter the queryset take a look at the docs.
To create a model instance select the POST request and submit it to classes/ , eg. classes/Article . With POST requests you have to provide query parameters. For example:
< "title": "Another article", "content": "This is another test article added via the API", "category": < "__type": "Pointer", "className" :"ArticleCategory", "objectId": "pPGdxPAxQA" >, "author": < "__type": "Pointer", "className": "_User", "objectId": "LFAf3yD8w0" >>To update a model select the PUT request type and submit it to classes// , eg. classes/Article/oRwkdx7KgX . You’ll have to provide query parameters containing data you’d like to change:
To delete a model instance select the DELETE request type and submit it to classes// , eg. classes/Article/oRwkdx7KgX .
If the request was successful an empty body will be returned.
To learn more about REST requests with Back4app take a look at the API reference.
Our backend for a mobile app is now more or less complete. To connect it to your mobile app you’ll have to do the following:
For detailed instructions take a look at our docs:
The terms frontend and backend refer to the separation of concerns between the presentation layer and the data access layer.
These days almost every mobile application has its own backend due to all the great perks a backend has to offer. Backends allow mobile applications to collect analytics, send push notifications, monitor apps, collect crash reports and more.
There are multiple ways of building a backend. You can either:
Using MBaaS is a great option since it’s really cheap compared to a custom backend while providing a lot of flexibility. Back4app is one of the best MBaaS providers that allows you to build a backend in a matter of days — or even hours.
A backend for a mobile application is the part of the app that runs on a server, rather than on the device itself. The backend provides the functionalities that the app needs to store and manage data, authenticate users, process and analyze data, and communicate with other systems or services.
– Register on Back4app
– Create the database structure
– Enable the admin panel for easier management
– Secure your backend by using ACL/CLPs
– Test your backend
– Pick a technology (eg. Django, Express, Ruby on Rails)
– Setup a database and connect your backend to it
– Define backend URLs and write the view logic
– Test your backend (unit tests, security vulnerabilities)
– Pick a deployment platform for example AWS or Heroku
– Deploy the backend
Nik, from Slovenia, is a versatile full-stack developer skilled in languages like Python, Java, and JavaScript. Beyond coding, his expertise spans server administration, graphic design, and technical writing. Driven by excellence, Nik thrives on challenges and consistently aims for perfection in his endeavors. More details are available on this LinkedIn profile .